 Pigeon pose, like any other pose, can be safely practiced following total hip replacement if you approach it slowly, remain focused, and modify the pose as needed. Keep in mind that there are several variations of pigeon pose
Before practicing Pigeon Pose following THR
– Strengthen and warm-up your body before practicing any pose that challenges the hips, especially those poses that require outward rotation,
– Don’t attempt pigeon pose until your surgeon has lifed all restrictions,
– Build strength. Practice standing poses like Chair Pose, Warrior I, Warrior II, and Tree pose. Standing poses are an excellent way to build strength while at the same time promoting the mobility of the hip joints.
When you are ready to try pigeon pose following total hip replacement start by exploring outward rotation
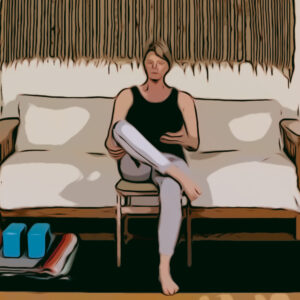
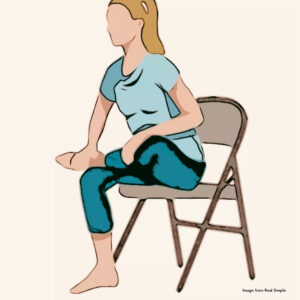
This will help you learn about your range of motion. First try sitting in a chair with your ankle on your knee. This will help you determine what to work on in terms of building flexibility. (Note: If you cannot comfortably place your ankle on your knee then it is too soon for pigeon pose.)
– Place your ankle on your knee. To be safe, at first support your leg with your hand,
– Start with your knee “high,”
– Close your eyes, release your hand and begin to relax your leg and knee toward the floor,
– Let the weight of gravity help your knee drop. DO NOT PUSH DOWN ON YOUR KNEE,
– Observe sensations and observe the position of your knee. If it is comfortably moving towards horizontal then you could move on to the next step. If it remains quite high then continue to practice with relaxing and releasing the knee with gravity and continue to practice open-hip standing poses.
By doing this exercise and by continuing to practice standing poses, you will learn about your range of motion and you will safely begin to create more flexibility in your hip.
Experiment with variations on pigeon pose
– In a chair, begin to experiment with leaning forward over your knee. Deepen the stretch very slowly. The stretch you feel can be intense but should not “hurt” and DO NOT PUSH DOWN ON YOUR KNEE. In this position you have a lot of control over how much you stretch the hip joint and you are mimicking the position of the leg in classic pigeon pose.
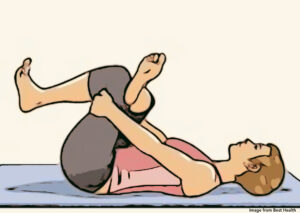
– Try moving to the floor to practice this same position on your back. Place your ankle on your thigh and hold the bottom leg with your hands. DO NOT PUSH ON YOUR KNEE. Here your hands and bottom leg can control how deep you stretch . Go slow and pay close attention to how your hip feels.
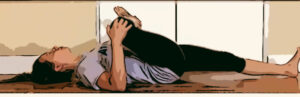
Try holding your top leg in position in outward rotation with your hands while allowing the bottom leg to extend on the floor. This gives a stretch to your hip flexor muscles.
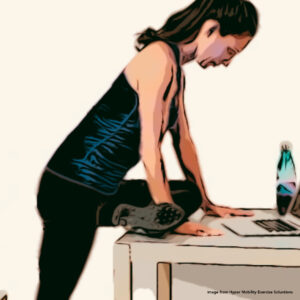
– Pigeon pose can be practiced standing at a table or a desk. This is another position where you can manage the amount of stretch on your hip and experiment with how deeply it wants to go into outward rotation. I really like this one because you can control the amount of weight on your front leg and you get the beginnings of extension in your standing leg.
– Finally, if you feel ready, try the pose in the traditional position.
Don’t be in a rush. Be comfortable and confident with the previous variations then move to the full pose.
– Ease in to it by using a block or bolster under your hip.
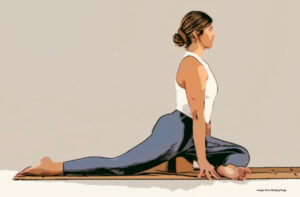
– Try the pose with your back high while supporting yourself with your hands. This deepens the stretch of your hip flexors in the back leg.

– Or, try resting forward over your leg. This deepens the stretch of the hip on the front leg and can be very soothing if you’ve done your hip prep ahead of time.

Know that whatever shape your pose takes you are getting the benefits. Observe how the pose feels at each stage and move on to the next level when you feel ready.
Remember! You’ll be looking for what feels very natural and delicious! And, above all, enjoy the process.
Here’s to healthy and happy hips!
Key Takeaways
- Pigeon Pose can be safely practiced after a total hip replacement—but only when your surgeon lifts all movement restrictions and you’ve built foundational strength.
- Start with standing poses like Warrior I, Warrior II, Tree Pose, and Chair Pose to prepare your body and increase hip mobility.
- Always warm up and explore outward hip rotation before attempting Pigeon Pose. Use a chair or reclined position to assess your flexibility and comfort.
- Never push on your knee. Let gravity do the work. Use props like blocks, bolsters, or a wall/table to support your transitions.
- There are many variations of Pigeon Pose to suit different stages of recovery—from chair-based to wall-supported to reclined or standing versions.
- Ease into each variation slowly, and let sensation—not ego—guide your progression.
- Modifying the pose still delivers its benefits: increased hip flexibility, reduced tightness in hip flexors, and improved comfort during daily movement.
Frequently Asked Questions (FAQs)
1: When can I safely try Pigeon Pose after hip replacement surgery?
Only after your surgeon has lifted all post-op restrictions and you’ve regained sufficient strength and mobility in the hip. Always get medical clearance before attempting deeper poses.
2: What should I do before attempting Pigeon Pose?
Warm up the body and strengthen your hips through standing poses like Warrior I & II, Tree Pose, and Chair Pose. Also, assess your range of motion with seated hip-opening movements.
3: What if I can’t place my ankle on my knee comfortably?
That’s a sign your hip isn’t ready for Pigeon Pose. Continue working on flexibility and strength with supported seated or standing poses and avoid forcing the leg into outward rotation.
4: Are there alternatives to classic Pigeon Pose on the floor?
Yes! Try chair-supported variations, lying on your back (reclined pigeon), or standing with your leg supported on a desk or table. These give you more control and minimize pressure on the joint.
5: Can I deepen the stretch by pushing on my knee?
No. Never push on your knee, as this can place too much pressure on the hip joint. Allow gravity and breath to guide the stretch gradually.
6: How will I know when I’m ready to try traditional Pigeon Pose?
You’ll notice improved hip flexibility, comfort in modified versions, and confidence during standing poses. The transition should feel natural, not forced or painful.
7: What props can I use to make Pigeon Pose more accessible?
Use yoga blocks, bolsters, or folded blankets under the hip or chest for support. These help you find comfort and avoid strain as you ease into the pose.
8: What are the benefits of practicing Pigeon Pose after THR?
When done safely, Pigeon Pose enhances hip flexibility, relieves tension in the glutes and hip flexors, supports healthy range of motion, and encourages mindful movement.
Member Videos:
Standing Poses, Feet, Legs, Pelvis Position in Open-hip Poses, Warrior II / Virabhadrasana II, Triangle Pose / Trikonasana, Half Moon Pose / Ardha Chandrasana, Getting Down to and Up from the floor
Non-Member Preview: Standing Poses
Free video: Yoga while healing from Total Hip Replacement Surgery: A safe post-op asana practice
Become a member of Yoga for Hip Replacement here
Articles and Studies:
Go Slow: Build New Neural Pathways
Cultivate the Beginner’s Mind: Slow down, be curious, start small.
Talk to your surgeon or healthcare provider before beginning any athletic program.
Download PDF of informational flyer here
© 2021 Yoga for Hip Replacement | Privacy Policy | Terms of Use
© 2021 Yoga for Hip Replacement | Privacy Policy | Terms of Use